
Organization Management: Step-by-Step
This guide covers three different categories of tasks that relate to organization management: (A) Registering an Organization, (B) Modifying an Organization, and (C) Assigning an Authorized Individual to an Organization.
A. Registering an Organization
If you have been authorized to complete business transactions on behalf of an Organization in the National Online Licensing System, and provided with an Organization Authorization Code by the Department of Fisheries and Oceans (DFO), follow the steps below to register the Organization in your online profile.
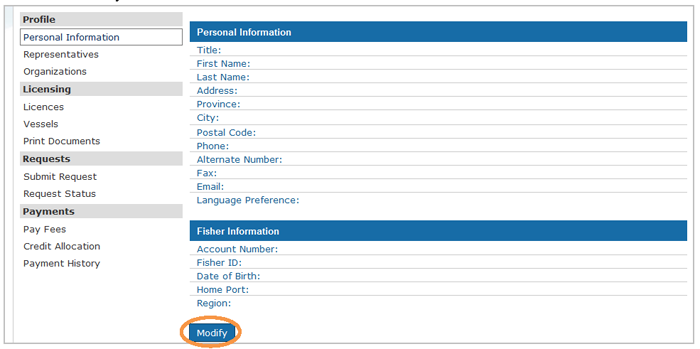
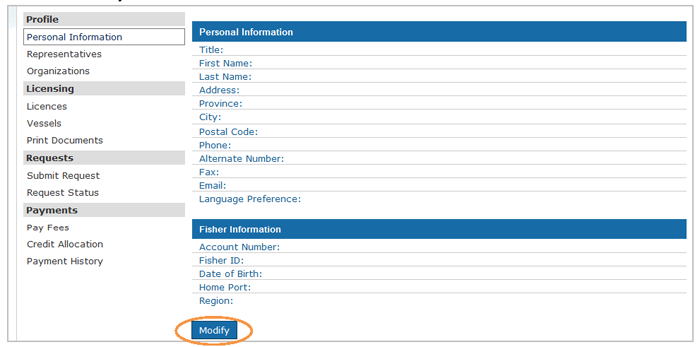
- Click the "Modify" button at the bottom of the "Profile" screen.
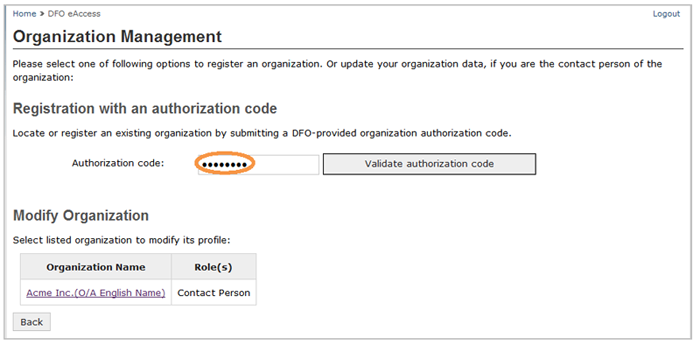
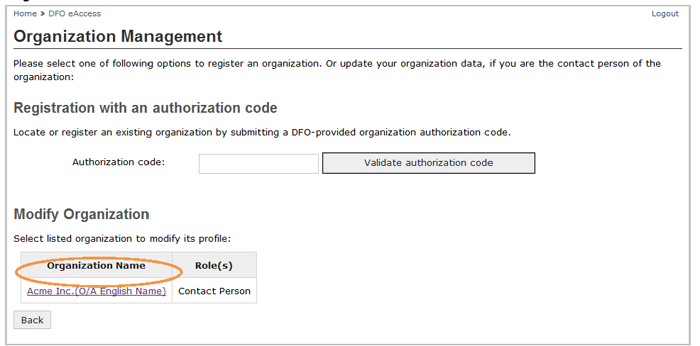
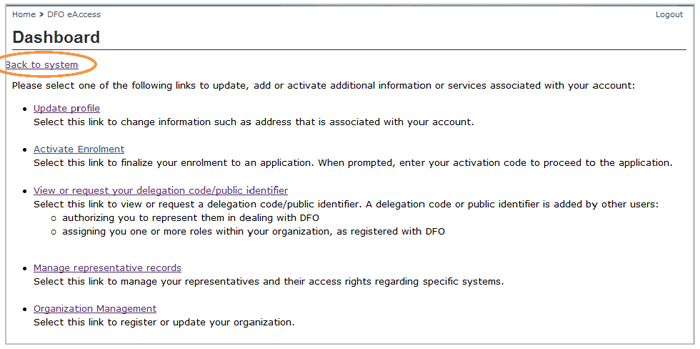
- Click the Organization Management link.

- Type the DFO-provided Organization authorization code into the "Authorization code" box and then click the "Validate authorization code" button.
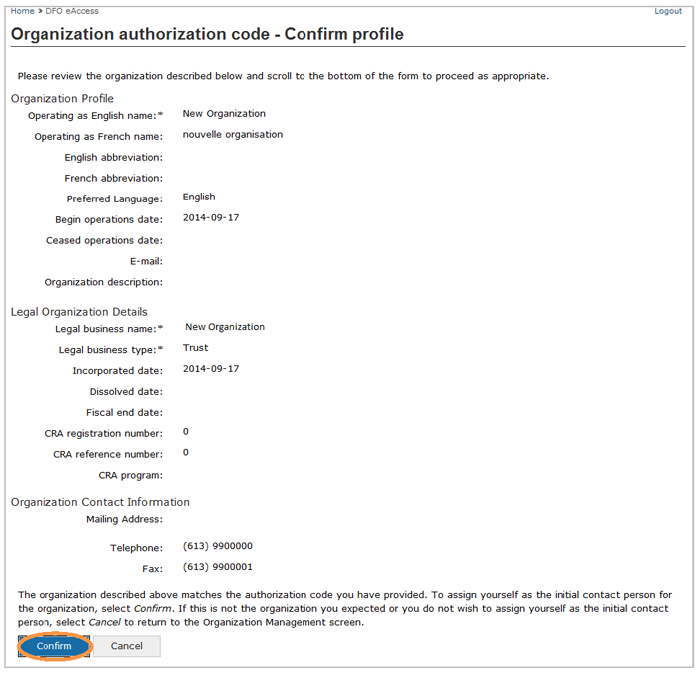
- Review the Organization details and ensure the information listed on the screen is correct. You will be prompted to fill in any missing information. Click "Confirm" if the details are complete.
- Upon confirmation, you should return to the "Organization Management" screen. Your Organization should now appear and be listed as an Organization that can be modified.

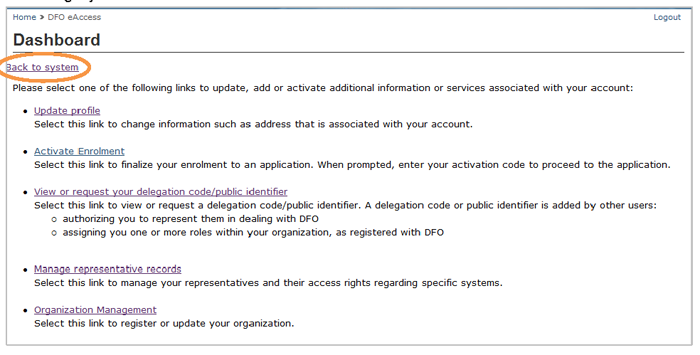
- Click the "Back" button on the "Organization Management" screen. Then, from the "Dashboard" screen, click the "Back to System" hyperlink to return to the National Online Licensing System.
B. Modifying an Organization
To modify the contact information for an Organization for which you are authorized to complete business transactions using the National Online Licensing System, follow the steps below.
- Click the "Modify" button at the bottom of the "Profile" screen.
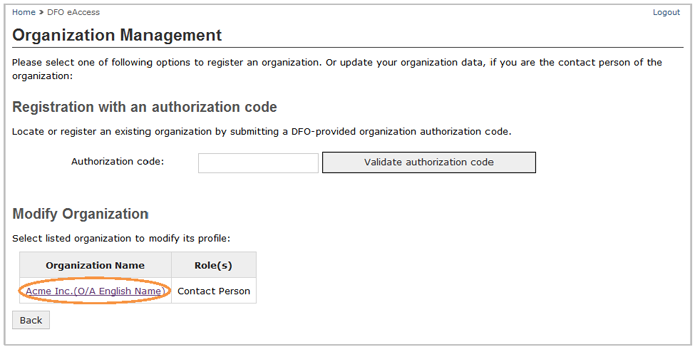
- Click the "Organization Management" link.

- Select the Organization that you wish to update by clicking the name of the Organization.
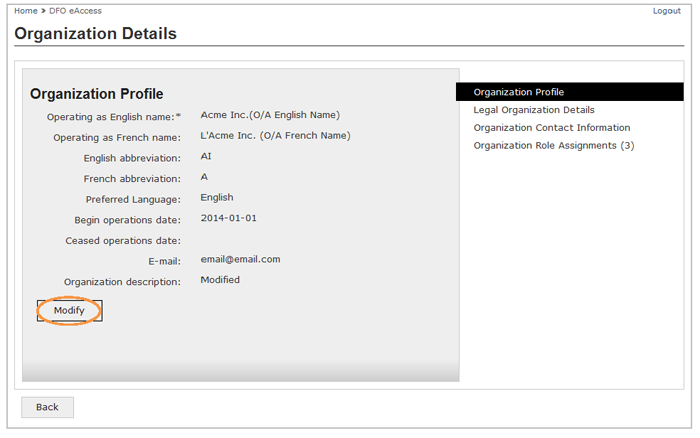
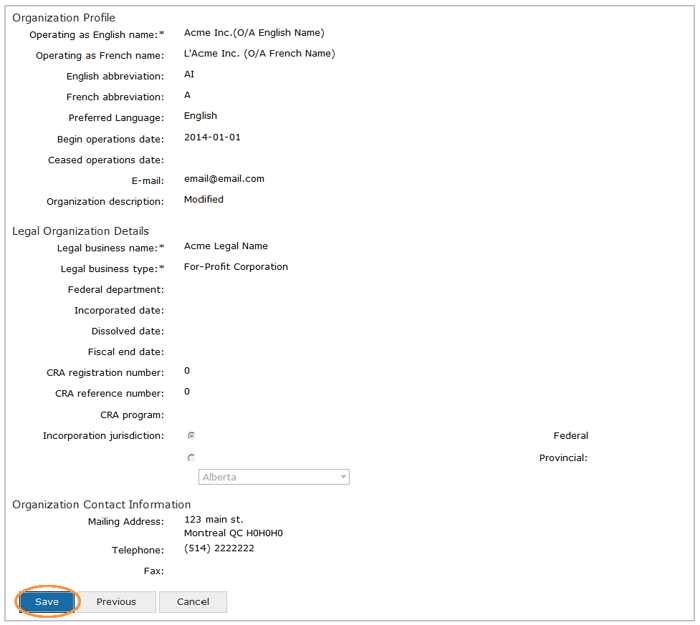
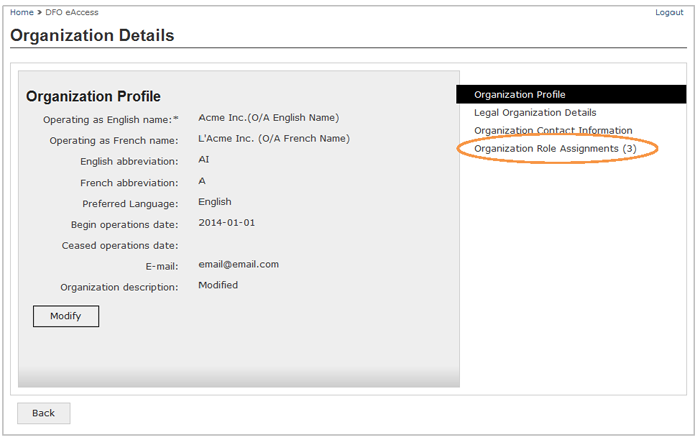
- The "Organization Details" screen will list the information about this Organization. Click on the "Modify" button after the "Organization Contact Information" table.
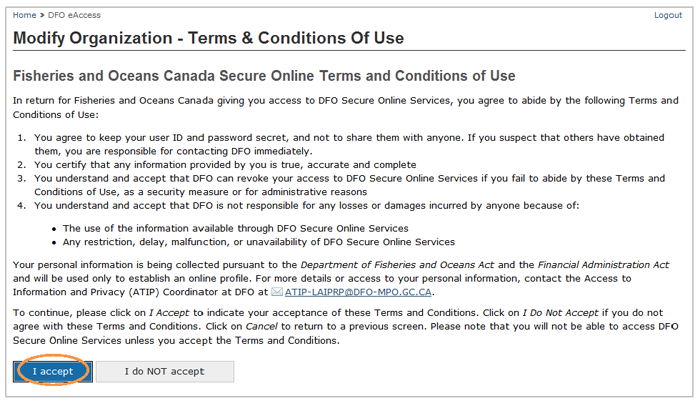
- Read the "Modify Organization – Terms and Conditions of Use" screen and click the "I accept" button.
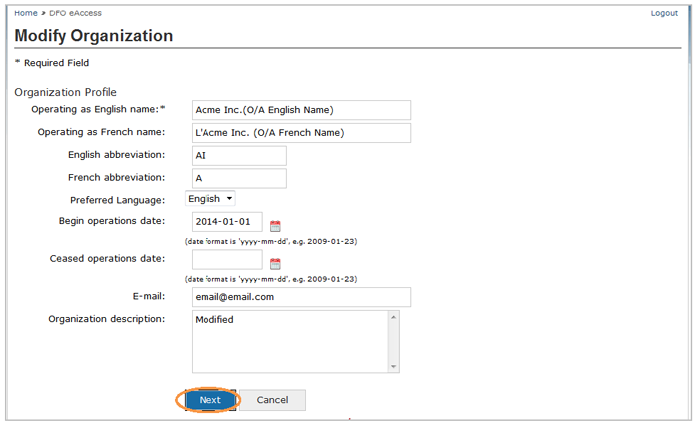
- Type the required information into the "Organization Profile" screen. When you are finished, click the "Next" button.
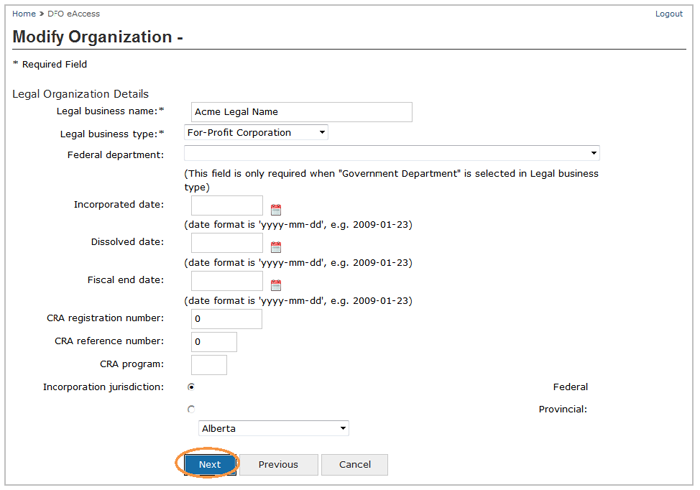
- Type the required information into the "Legal Organization Details" screen. When you are finished, click the "Next" button.
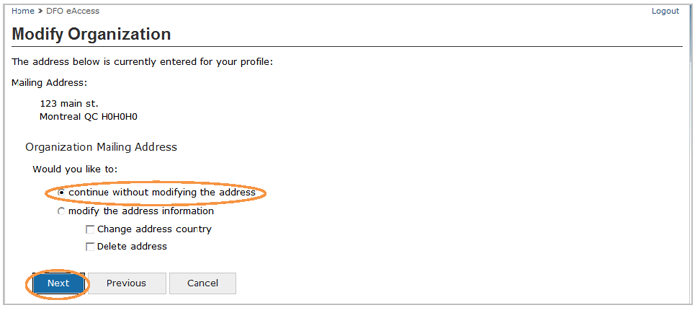
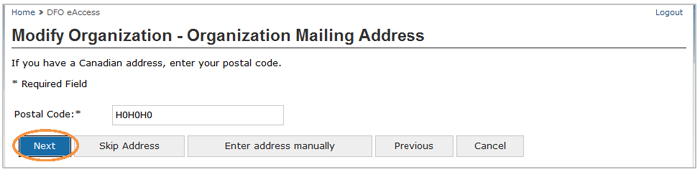
- Review the address on the "Organization Mailing Address" screen. You may continue without modifying the address. To do this, click on the "continue without modifying the address" button and then the "Next" button. If this information is not correct, you may modify the address by clicking your cursor into the box beside the "change address country." When you are finished, click the "Next" button.

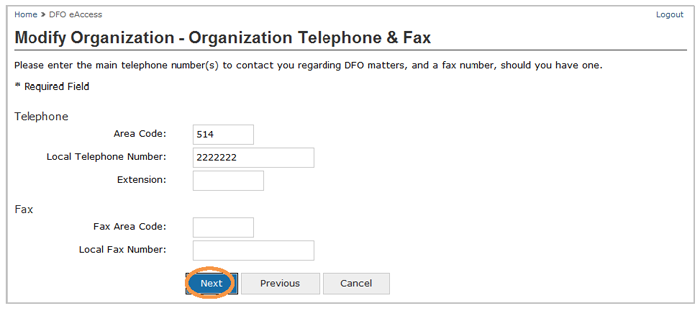
- If you chose the "continue without modifying the address" button, you will need to review the Organization's telephone number and fax number. Type the required information into the "Modify Organization - Organization Telephone & Fax" screen. When you are finished, click the "Next" button.
- You will come to the "Organization Profile Confirmation" screen. From this screen, click the "Save" button to return to the "Organization Details" screen. Click the "Back" button to return to the Dashboard screen and then click "Back to System" hyperlink to return to the National Online Licensing System.
- If you chose the "modify the address information" button, you will need to make the necessary address changes through a series of instructed screens before you return to the National Online Licensing System.
C. Assigning an Authorized Individual to an Organization
If you are already authorized to complete business transactions on behalf of an Organization in the National Online Licensing System and you wish to authorize one or more other individuals to complete business transactions on behalf of the Organization, please follow the steps below.
Note A: The National Online Licensing System supports a one-to-many relationship in Organization Management, which means that more than one individual may be authorized to conduct business transactions on behalf of the Organization.
Note B: Only individuals may be authorized to conduct business transactions on behalf of an Organization. Other Organizations or companies cannot be authorized to do so.
Note C: You will need to have the unique Public Identifier of the individual you wish to assign to the organization. Please refer to the "Getting a Delegation Code or a Public Identifier: Step-by-Step" guide to find out how to obtain a Public Identifier.
- Click the "Modify" button at the bottom of the "Profile" screen.

- Click the "Organization Management" link.

- Select the Organization that you want to assign a new authorized individual.
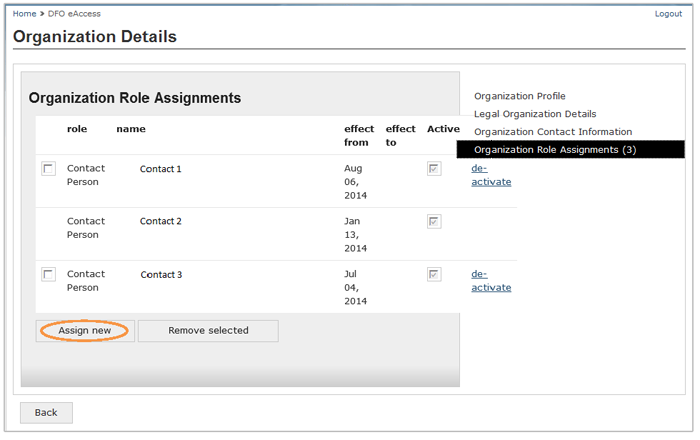
- At the side of the "Organization Details" screen, there is a section called "Organization Role Assignments" in which all authorized persons will be listed. Click the "Assign New" button at the bottom of the list.
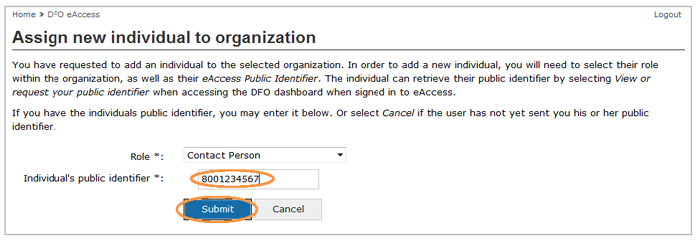
- Choose the role of this individual in the "Assign new individual to Organization" screen. Then, type in the individual's Public Identifier that they have obtained through their own personal profile. When you are finished, click the "Submit" button.
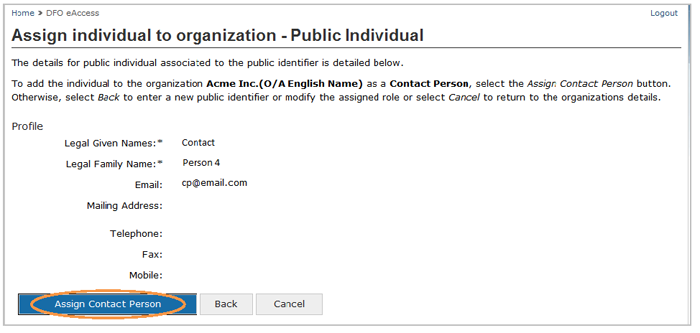
- The details for the assigned individual should appear in the "Assign individual to organization - Public Individual." If this is the correct person, click on the "Assign Contact Person" button.
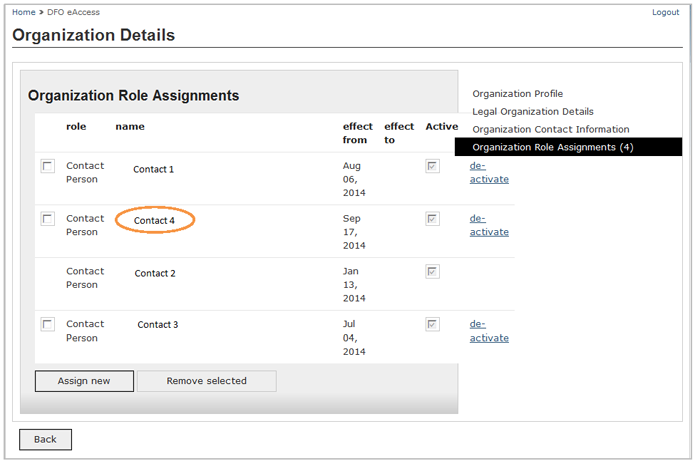
- The assigned individual should now appear in the "Organization Details" screen.
- Click the "Back" button under the "Organization Contact Information" table, and click the "Back" button at the bottom of the "Organization Management" screen. Then, from the "Dashboard" screen, click the "Back to System" hyperlink to return to the National Online Licensing System.
- Date modified: