
User training manual
3. Representatives
You may appoint a representative to renew your licence, submit requests, pay your fees, print your documents, and receive your notifications. A representative or delegate could be a family member, friend, colleague or any other trusted individual you would like to conduct business on your behalf. To do this, you will need to log inFootnote 30 to the National Online Licensing System to add a representative to your account. Section 3.1 will take you step-by-step through this process.
If you would like to become a representative, this process is explained in Section 3.2. To use the National Online Licensing System as a representative, proceed to Section 3.3.
3.1 Appointing a Representative
Important Note
Before you can appoint a representative, you must ensure that the person who will be your representative has a delegation codeFootnote 31 and that you have this code ready to enter into the system. If you want to appoint more than one representative, you will need to have the delegation code from each of these persons.
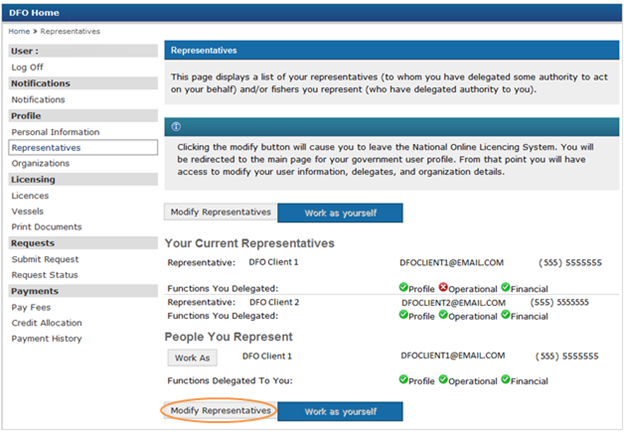
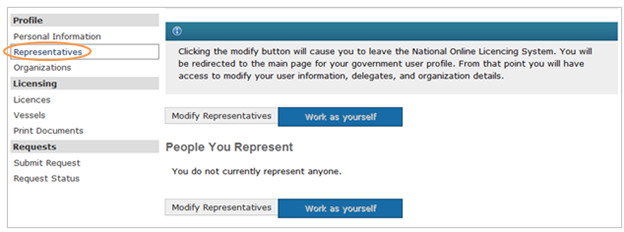
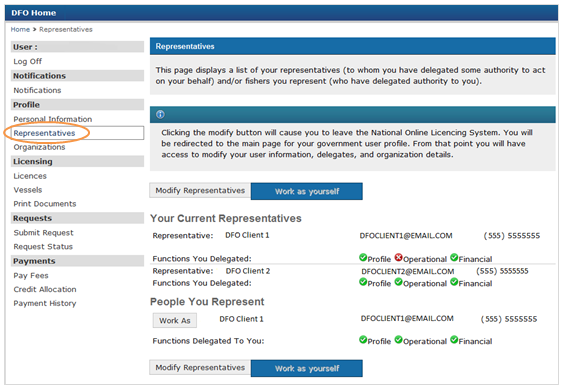
Click the “Representatives” hyperlink on the left-navigation menu under the “Profile” section and the screen will appear.
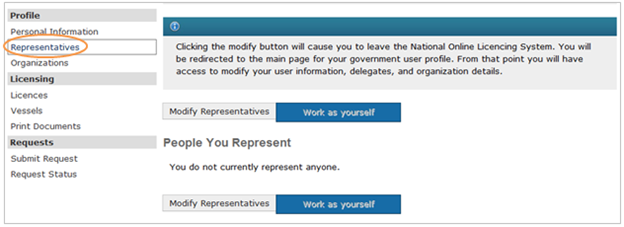
Since you do not yet have any representatives, click the “Modify Representatives” button above the "Your Current Representatives" section at the top of the screen.

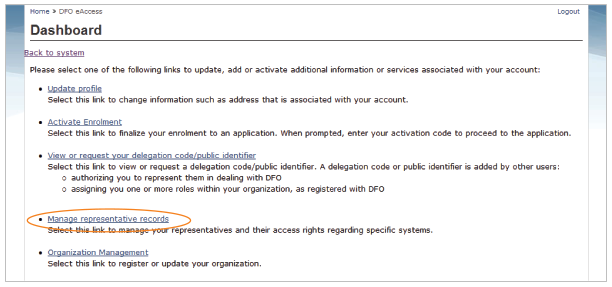
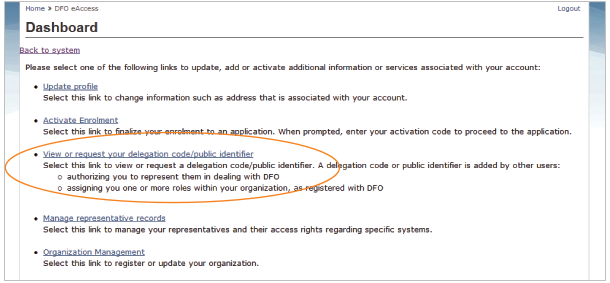
This will take you to the “Dashboard” screen, which is in a secure location of the Fisheries and Oceans Canada website.
A few steps are required within this website to appoint a representative, and then you will automatically return to the National Online Licensing System.
1. Click the “Manage representative records” link on the “Dashboard” screen.
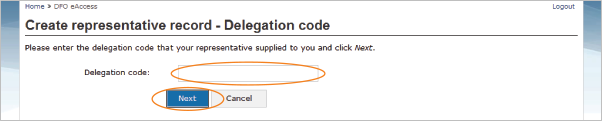
2. Click the “Create new representative record” button.

3. Type the delegation code for your representative into the white box. The delegation code must be a 10-digit set of numbers. When you are finished typing in the delegation code, click the “Next” button. The National Online Licensing System has a delegation limit set in place. If you receive the limit warning when entering a delegation code, please contact Client Support or your representative for assistance.
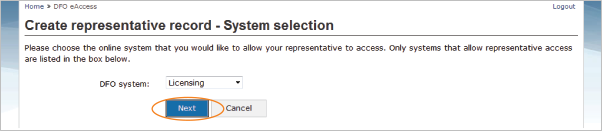
4. The “Create representative record – System selection” screen will appear. This screen allows you to choose the online system that you want your representative to have access to, which will be "Licensing." Click the “Next” button to continue and the "Authorized representative" on the screen should be the name of your representative.
Important Note
If this is not the person who you intended to appoint as your representative, click the “Cancel” button to return to the “Create representative record – System selection” screen and then, click the “Cancel” button on this screen to return to the “Create representative record – Delegation code” screen. Re-enter the delegation code and repeat step #4. If the person listed in the “Representatives Details” box is still not the name of your representative, cancel this process and contact your representative to ensure you have their correct delegation code.
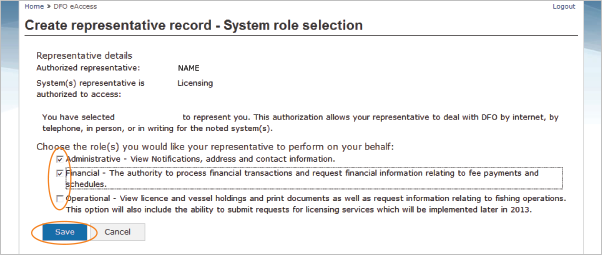
5. If the "Authorized representative" is the correct name of your representative, you will now need to choose the system-specific roles that you want to appoint to your representative.

Roles:
1. Administrative: The ability to receive and view notifications, address, contact information.
2. Financial: The authority to process financial transactions and request financial information relating to fee payments (licensing, fisher registration or vessel registration payments) and schedules.
3. Operational: The ability to view licence and vessel holdings, print documents, submit requests and request information relating to fishing operations and licensing services.
To select a role or a combination of roles you will need to click your cursor in the box beside it and a checkmark will appear in the box. To deselect a role, click the box again and the checkmark will be removed. When you are finished, click the “Save” button.
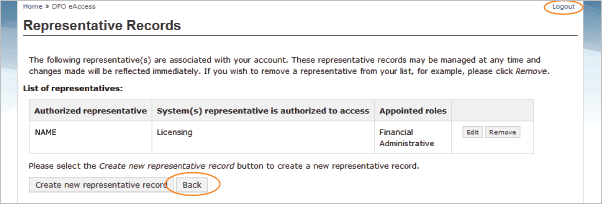
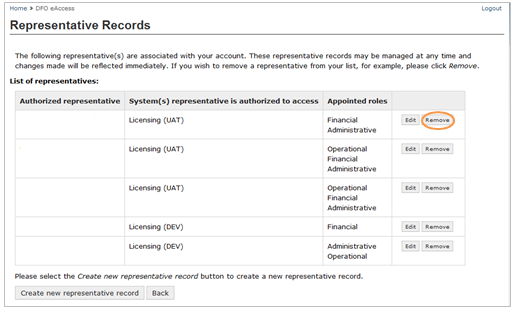
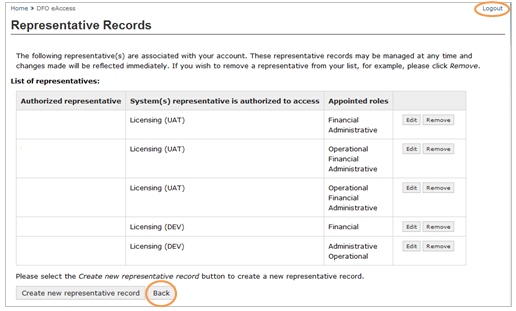
6. The “Representative Records” screen will appear showing your representative, including the role or roles that you have appointed this person to do using the National Online Licensing System on your behalf. Verify that the information is correct. Then click the "Logout" link to end the process or click the "Back" button to return to the National Online Licensing System.
When you appoint a representative within the “Dashboard” section of the DFO website, this person will automatically appear in your representative list in the National Online Licensing System. To view this information, click the “Representatives” hyperlink on the left-navigation menu.
3.1.1 Removing a Representative
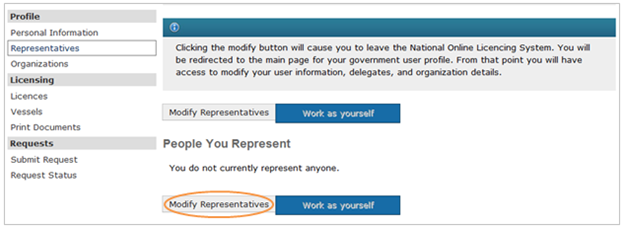
To remove a representative from “Your Current Representatives” list on the National Online Licensing System, click the “Representatives” hyperlink on the left-navigation menu under the “Profile” section and the screen will appear.
Click the “Modify Representatives” link at the bottom of the screen. This will take you to the “Dashboard” screen, which is in a secure location of the Fisheries and Oceans Canada website.
Only a few steps are required within this website to remove a representative.
1. Click the “Manage representative records” link on the “Dashboard” screen to get to the “Representative Records” screen.

2. Click the “Remove” link and the representative will be removed.
3. Then click the "Logout" link to end the process or click the "Back" button to return to the National Online Licensing System.
When you remove a representative within the “Dashboard” section of the DFO website, this person will automatically be removed from your representative list on the National Online Licensing System. To view this information, click the “Representatives” hyperlink on the left-navigation menu.
3.2 Becoming a Representative
If you would like to become a representative to conduct business for a DFO Client using the system on their behalf, you will need to take a few important steps. This begins by logging in to the National Online Licensing System.Footnote 32
If this is the first time that you are accessing the system, you will need to follow the steps outlined in Section 3.2.2.
If this is not the first time that you are accessing the system, log on with your log in credential and click the “Representatives” hyperlink on the left-navigation menu under the “Profile” section and the screen will appear.
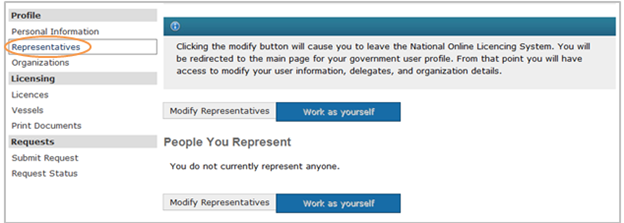
Under the “People you Represent” section, click the “Work as yourself” button and proceed to Section 3.2.1 below to get your delegation code.
3.2.1 Getting your Delegation Code
To become a representative, you need a delegation code. This 10-digit set of numbers will be different for every person and business. You will need to provide your delegation code to the DFO Clients who wish to appoint you as their representative so they are able to take the steps necessary using the National Online Licensing System.
To get your delegation code, log on to the system and click the “Representatives” hyperlink on the left-navigation menu.
Under the “People you Represent” section, click the “Modify Representatives” button. This will take you to the “Dashboard” screen, which is in a secure location of the Fisheries and Oceans Canada website.
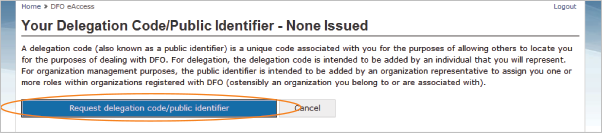
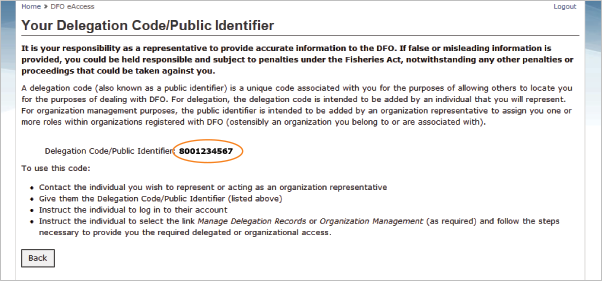
Click the “View or request your delegation code/public identifier” link on the “Dashboard” screen to get to the “Your Delegation Code/Public Identifier – None Issued” screen.
Next, click the “Request delegation code/public identifier” button and the “Your Delegation Code/Public Identifier” screen will appear with your delegation code. You should write this number down and keep it in a safe place.
The final step in the process of becoming a representative will require that you contact the DFO Client who would like to appoint you as a representative. The DFO Client may wish that you provide them with the instructions on how to log in to their account on the National Online Licensing System in order to appoint you as a representative.Footnote 33
The National Online Licensing System has a delegation limit set in place. The DFO Client you are representing may also contact you if they receive a limit warning when entering your delegation code. In the case that you would like to represent additional DFO Clients, past the set limit, you will need to create a new National Online Licensing System account, including a brand new GCKey.Footnote 34
To return to the National Online Licensing System, click the “Back to Dashboard” button, and from the “Dashboard” screen, click the “Back to System” hyperlink.

3.2.2 Registering an Online Profile with the Department
You will need to register an online profile with the Department before you may become a representative. To do this, you will need to complete a few key steps that are outlined in Section 1.6.2.
Once completed you will now be on the National Online Licensing System and may complete the tasks required to become a representative as described in Section 3.2.
3.3 Using the System as a Representative
Once you have been appointed as the representative of a DFO Client or multiple Clients, you may log inFootnote 35 to the National Online Licensing System to complete licensing tasks that you are authorized to do on behalf of this person or these persons.
Important Note
The National Online Licensing System supports a “one-to-many relationship.” This means that one representative may be appointed to work on behalf of two, 20 or 200 DFO Clients (or more).
A representative will use the same log in credential,Footnote 36 such as a GCKey User ID and password, to manage all of the DFO Clients who have appointed him or her as their representative. However, each of these represented Clients must also have their own log in credential to be able to log in to the system in order to appoint this representativeFootnote 37 to conduct business on their behalf.
A representative who is also a fishing licence holder may use the same log in credential to manage their own licensing, fisher registration, and vessel registration transactions.
The role of a representative is specific to an individual (a Fisher), and not an Organization. While a representative can pay fees, print documents, renew licenses, submit requests and see all information in an individual’s holding, including any Organizations they are authorized to manage, a representative cannot modify the structure of an Organization. For more information on Organizations and assigning an authorized individual to manage an Organization, please see Section 4.4 of the manual.
3.3.1 Completing Profile Functions as a Representative
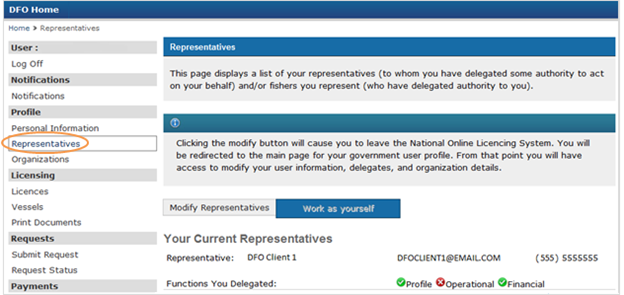
If you have been appointed by one or more DFO Clients to perform an administrative role, you may receive notifications and print documents for this person or these persons. In the National Online Licensing System, this role is called “Profile Functions.”
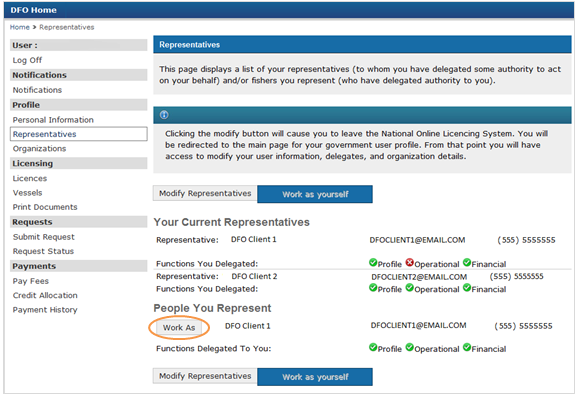
To complete these tasks, log on to the National Online Licensing System and click the “Representatives” hyperlink from the left-navigation menu. The list of Clients you represent will be shown in the “People You Represent” section.
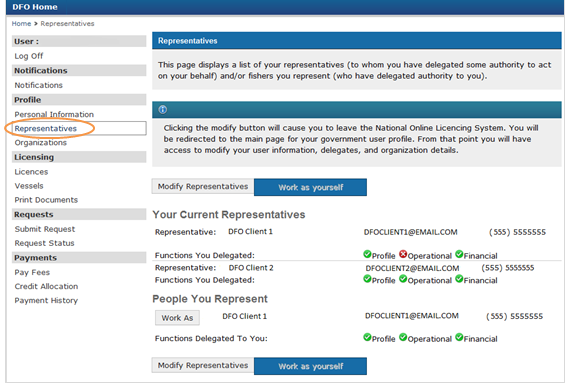
Click on the “Work As” button underneath the name of the Client for whom you need to conduct business. The “Notifications” screen will appear and you will notice a new field, “Working As” with the name of the Client for whom you are working.
As a representative authorized to read notifications and to print documents, you may now complete these tasks by following Section 2.2.1 and Section 5.1 of this manual.
3.3.2 Completing Financial Functions as a Representative
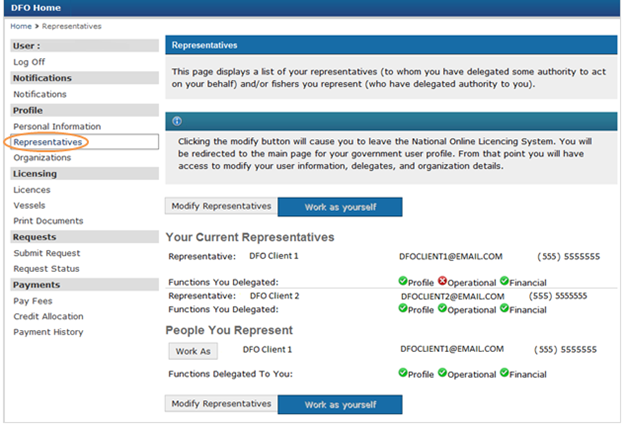
If you have been appointed by one or more Clients to perform a financial role, you may use the system to pay licence, fisher registration and vessel registration fees or specific request payments for this person or these persons. In the National Online Licensing System, this role is called “Financial Functions.”
To complete these tasks, log on to the National Online Licensing System and click the “Representatives” hyperlink from the left-navigation menu. The list of Clients you represent will be shown in the “People You Represent” section.
Click on the “Work As” button underneath the name of the Client for whom you need to conduct business. The “Notifications” screen of this Client will appear.
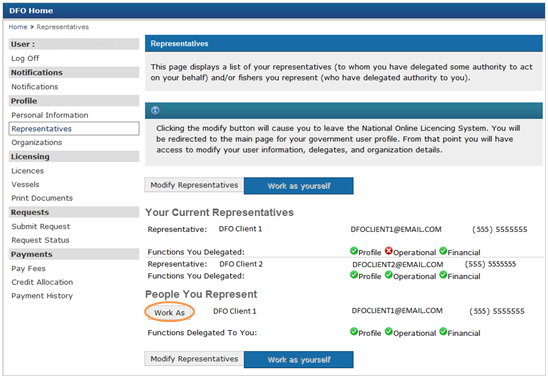
Notice the new field “Working As” in the top left corner, with the name of the Client for whom you are now working.
As a representative authorized to pay fees on behalf of this fish harvester, you may now complete this task by following Section 5.3 of this manual.
3.3.3 Completing Operational Functions as a Representative
If you have been appointed by one or more Clients to perform an operational role, you will be able to use the system to manage licensing transactions, submit requests and check the status of requests for this person or these persons.Footnote 38
- Date modified: